API Documentation
Now that you have some understanding of APIs and a NASA API key, you're ready to use any of the APIs offered by NASA. We'll focus on the Astronomy Picture of the Day API. Fortunately, NASA's APOD API has some built-in defaults which makes it very simple and convenient to access today's media. You may notice I said media. NASA's APOD can actually return a URL to a photo or video. Unfortunately, NASA's APOD API documenation isn't very detailed, and as it turns out, isn't up-to-date. Don't worry though! We'll discuss it thoroughly in the following sections.
Using the URL to Make a Query
Without doing anything fancy, we can make a request to the NASA APOD API by just using the URL to submit the query or request (specifically a GET request). At the time of writing this guide, entering https://api.nasa.gov/planetary/apod?api_key=DEMO_KEY into the browser yields the following chunk of text returned:
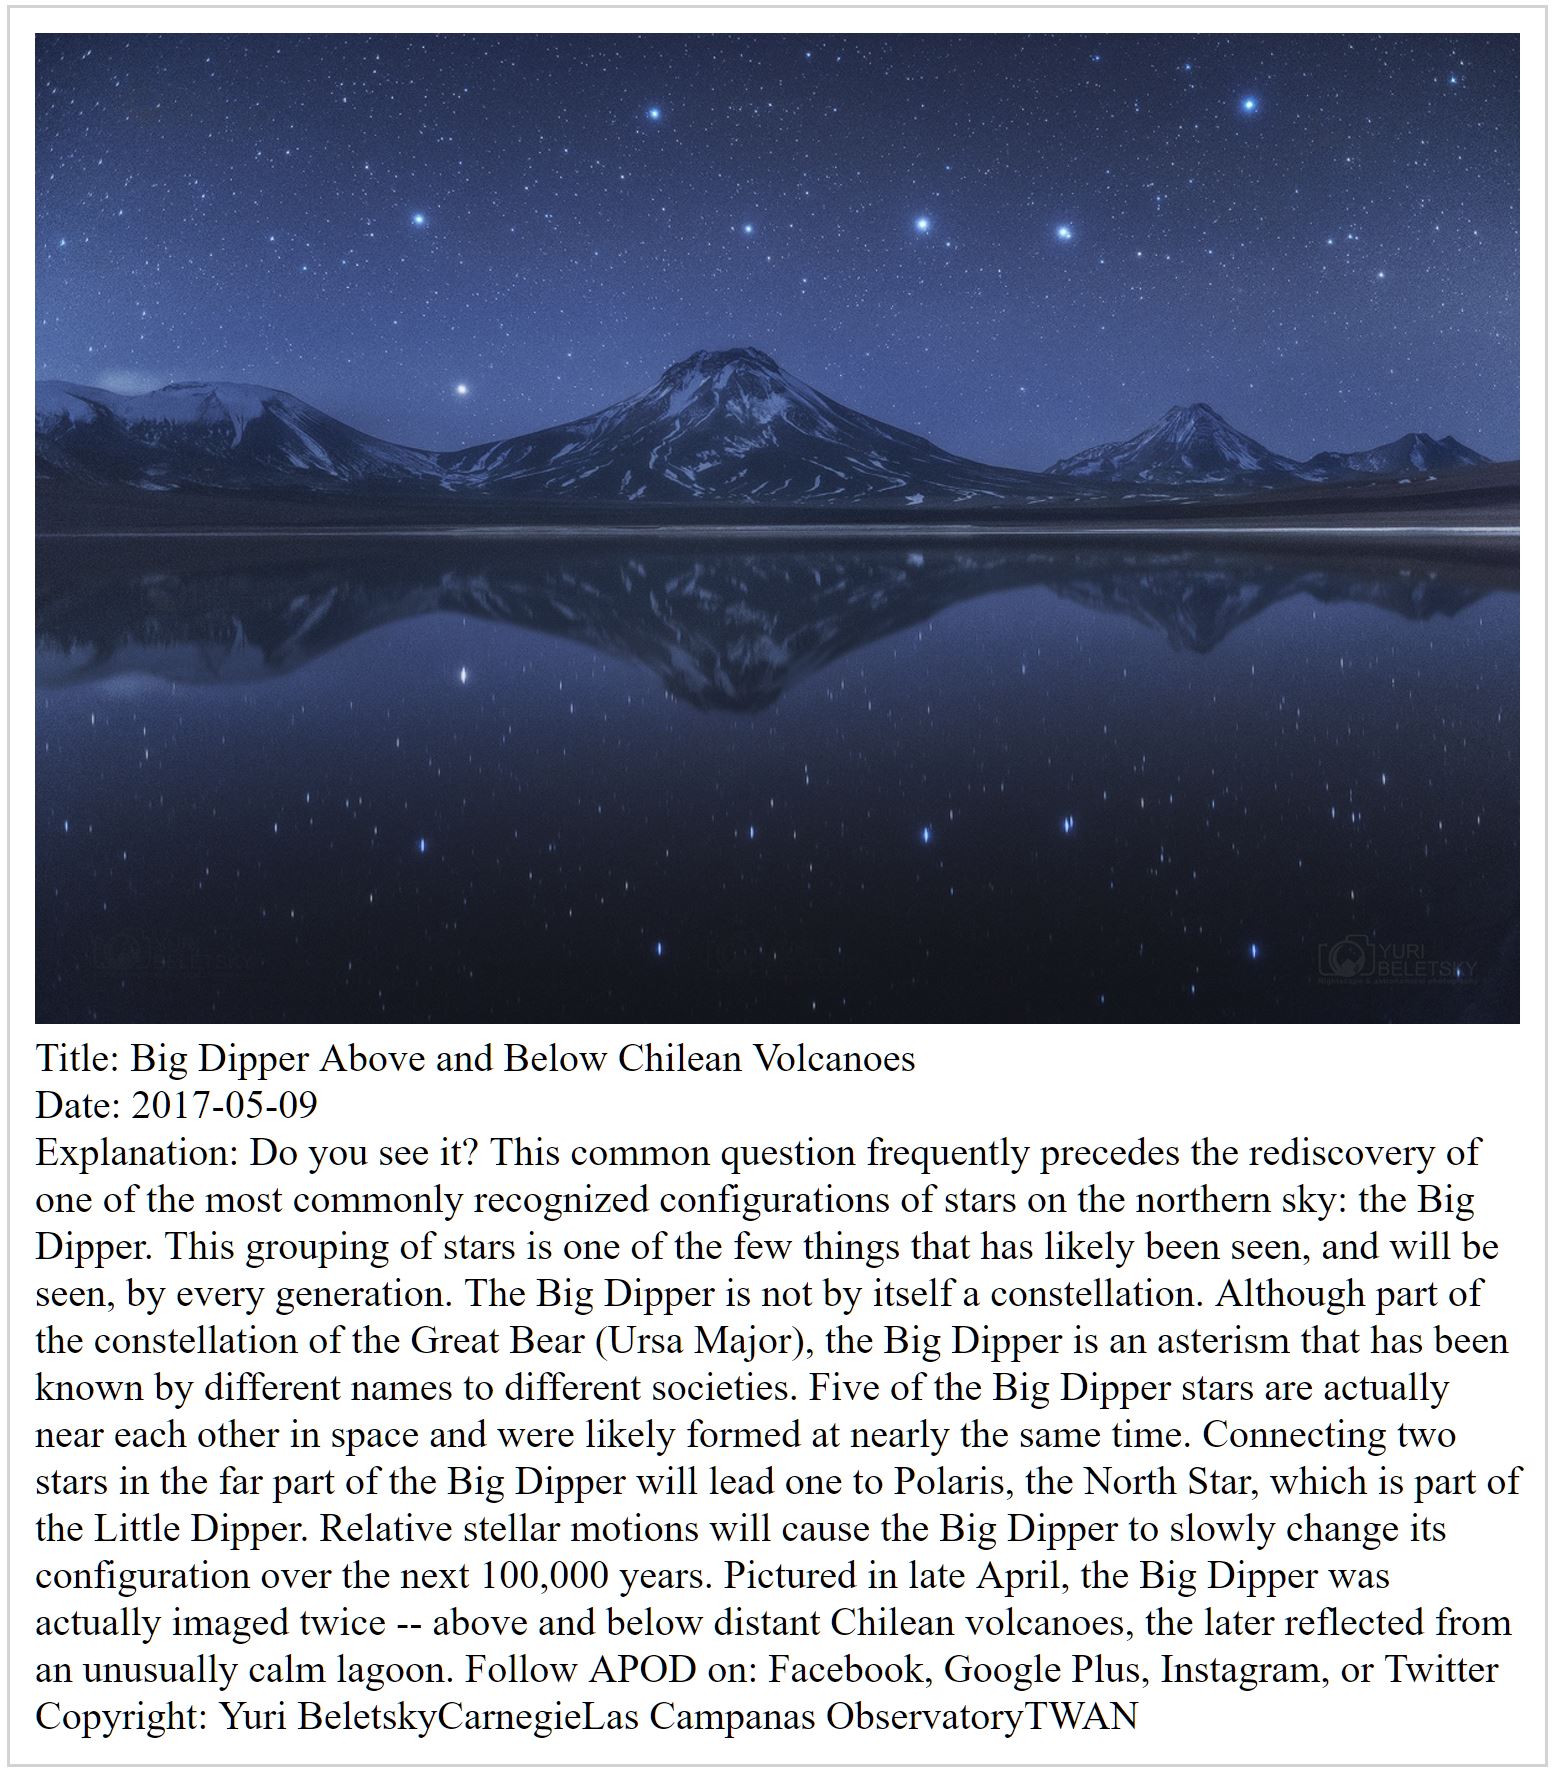
{
  "copyright": "Yuri BeletskyCarnegieLas Campanas ObservatoryTWAN",
  "date": "2017-05-09",
  "explanation": "Do you see it?  This common question frequently precedes the rediscovery of one of the most
    commonly recognized configurations of stars on the northern sky: the Big Dipper.  This grouping of stars is
    one of the few things that has likely been seen, and will be seen, by every generation.   The Big Dipper is
    not by itself a constellation.  Although part of the constellation of the Great Bear (Ursa Major), the Big
    Dipper is an asterism that has been known by different names to different societies. Five of the Big Dipper
    stars are actually near each other in space and were likely formed at nearly the same time.  Connecting two
    stars in the far part of the Big Dipper will lead one to Polaris, the North Star, which is part of the Little
    Dipper.   Relative stellar motions will cause the Big Dipper to slowly change its configuration over the next
    100,000 years. Pictured in late April, the Big Dipper was actually imaged twice -- above and below distant
    Chilean volcanoes, the later reflected from an unusually calm lagoon.    Follow APOD on: Facebook,  Google
    Plus,  Instagram, or Twitter",
  "hdurl": "https://apod.nasa.gov/apod/image/1705/DoubleDipper_Beletsky_1199.jpg",
  "media_type": "image",
  "service_version": "v1",
  "title": "Big Dipper Above and Below Chilean Volcanoes",
  "url": "https://apod.nasa.gov/apod/image/1705/DoubleDipper_Beletsky_960.jpg"
}
Thankfully we know some JSON, so we know that what we are getting back is an object containing a series of key-value pairs separated by commas. If you take the URL assigned to the "hdurl" or "url" property and enter it into the browser, you should get a cool-looking astronomy photo displayed.
Displaying the APOD Automatically
Now that you know know how to make a request using the a URL query string, you might be wondering how to automate the process of getting the APOD media and displaying it to the browser. Below is an example of code that can do just that. Click on the Result tab to view the finished page.
Let's go through the process of setting this up. Under the HTML tab, you'll see the page is set up with a few placeholder - namely a <div> for the image or video and a few <figcaption>to hold the date, explanation, title, and copyright values. If the image or media is in the public domain, the returned JSON object may not include a copyright property. Thus we will have in our JavaScript code a conditional statement to evaluate the existence of this property and display it if it does. The CSS tab contains some styling code that provides the HTML with some aesthetics. It's not critically important in this context so we will not discuss any CSS aspect in this guide.
Let's start at the very beginning of the JavaScript tab. The API key is saved as in the variable apiKey at the top of the code for easy reference. And should you want to share your code, having a single location for your key makes it easy to remove your key prior to sharing. After that you'll see the XMLHttpRequest constructor is called and the result of that call returns a XMLHttpRequest object which is assigned to the variable req. The XMLHttpRequest object is what you use to make a HTTP request. It has a variety of methods that you can call, including loading the object with data (i.e. a URL query string for a GET request) or extracting data from the object once a response has been received. We call the XMLHttpRequest.open() method through our req variable. The syntax for this method is XMLHttpRequest.open(method, url, async). In this case, the method we want to use is "GET", the URL we want to send the GET request to is "https://api.nasa.gov/planetary/apod?api_key=" + apiKey, where apiKey will be substituted with our actual API key, and async is set to true because we want to make the call asynchronously. This allows the page to continue running its program without having to stop and wait for a response from the XMLHttpRequest object once we send it off.
So in order for us to know that we received a reponse, we need to add an Event Listener to the object using the appropriately named addEventListener() method. Its basic syntax is target.addEventListener(type, listener[, options]). The target in this case is our XMLHttpRequest object in req. The type refers to its event type, in this case we set it to "load" - as in we want to trigger this Event Listener once the resource we requested has finished loading. The second argument we provide is the callback function we want to execute once the resource has been loaded. This callback function makes up the bulk of the program needed to render the page. Before we get to that, I want to point out that if you scroll most of the way down, you'll see the command req.send(null). This is how we send off the XMLHttpRequest object. The XMLHttpRequest.send() method has an optional argument that takes in data to set as the request body. This is typically done for a POST request, where we usually provide a stringified JSON object, like this, in the request body. However, for our purposes, we don't need to send anything in the request body since we use the URL query string to send our request data. Thus we set the optional argument to null so we explicitly know nothing is being sent in the request body.
Now back to the callback function. The syntax may look a bit odd and it's because the callback function is defined on the spot as it is being supplied as an argument to the function. The first thing that is done in the callback function is to have an if/else statement to evaluate the status of the req object. The XMLHttpRequest.status property holds the numerical HTTP status code of the response. The general rule of thumb is that anything in the 200's and 300's mean the response is OK, while anything in the 400's and 500's meant some error occurred. You can read more about it on Mozilla's HTTP response status codes page. So if the status of the response is good, we'll execute the commands necessary to extract the information from the response and render our page, else, the only thing that is done is this line of code towards the bottom of the page, console.log("Error in network request: " + req.statusText), which logs the error status to console.log.
The response we get back from the API call is stored in the XMLHttpRequest.responseText property. The value that is stored here is a stringified JSON object. As we learned in the "How to Use JSON?" section above, in order to access the key-value pairs we must first parse the string using the browser built-in function JSON.parse(). We do this in the line var response = JSON.parse(req.responseText), which assigns the results of the parsing to the variable response. Now response holds a JSON object which we can access the values of using either the dot or bracket notation. We will use the dot notation in this guide since it provides a cleaner look.
Before we process response, let's clean up anything on the page and give it a blank canvas to work with. This is primarily needed to prevent two media from coexisting on the same page. Also, as briefly mentioned, the copyright property may not be present in all returned JSON responses, so we want to erase that caption so it doesn't carry over. The following block of code clears the text content from all the <figcaption> we have in our HTML page by targeting the element's ID through the DOM:
document.getElementById("todayCaption1").textContent = "";
document.getElementById("todayCaption2").textContent = "";
document.getElementById("todayCaption3").textContent = "";
document.getElementById("todayCaption4").textContent = "";
And the following section of code removes anything that is in the <div> which holds the APOD media - either an <img> for an image or <iframe> for a video. This removal is done again through the DOM, this time using removeChild() method if hasChildNodes() returns true on that <div>.
var todayPhotoDivNode = document.getElementById("todayPhotoDiv");
while(todayPhotoDivNode.hasChildNodes() == true) {
  todayPhotoDivNode.removeChild(todayPhotoDivNode.lastChild);
}
Now we deal with the reponse. First we look at the media_type property of the response object. We have if / else if blocks to deal with whether it's an image or video. Thus, far I've only encountered these two categories of media_type thus far. At the time of writing this, the API documentation doesn't mention much about this. Through the DOM, we create an <img> for an image or an <iframe> for a video, we give it an identifier to make it easy to target, and then add these as child nodes to the media <div> on the main page.
if(response.media_type == "image") {
  var img = document.createElement("img");
  img.id = "todayPhoto";
  document.getElementById("todayPhotoDiv").appendChild(img);

  if(response.hasOwnProperty("hdurl")) {
  	document.getElementById("todayPhoto").src = response.hdurl;
  } else {
  	document.getElementById("todayPhoto").src = response.url;
  }
} else if(response.media_type == "video") {
  var vid = document.createElement("iframe");
  vid.id = "todayVideo";
  document.getElementById("todayPhotoDiv").appendChild(vid);

  document.getElementById("todayVideo").src = response.url;
}
The API documentation states that the query string can take a parameter hd and a bool value. It returns a high resolution image if the bool value is true. This info seems to be outdated. Regardless of whether or not you include the hd query parameter and supply it with true or false, the response will include the hdurl property if it exist. Typically if the media_type is an image, both hdurl and url exists. If it's a video, only the url property exists. Thus, in our code, we have to assign the URL in the src property of our <img> or <iframe> accordingly. As a precaution for future APOD media, if the media_type is an image, the code will evaluate the presense of a hdurl property using the hasOwnProperty() function, if it exists, it uses that URL as the source for the image, if not, then url is used instead.
Lastly, the following block of code deals with extracting the strings stored with the title, date, explanation, and copyright properties of the response object. As previously mentioned, the copyright property may not always be returned, thus we use hasOwnProperty() again to test for it before we set the caption. If we didn't not do this, then the caption would hold undefined if the property didn't exist.
document.getElementById("todayCaption1").textContent = "Title: " + response.title;
document.getElementById("todayCaption2").textContent = "Date: " + response.date;
document.getElementById("todayCaption3").textContent = "Explanation: " + response.explanation;

if(response.hasOwnProperty("copyright")) {
  document.getElementById("todayCaption4").textContent = "Copyright: " + response.copyright;
}
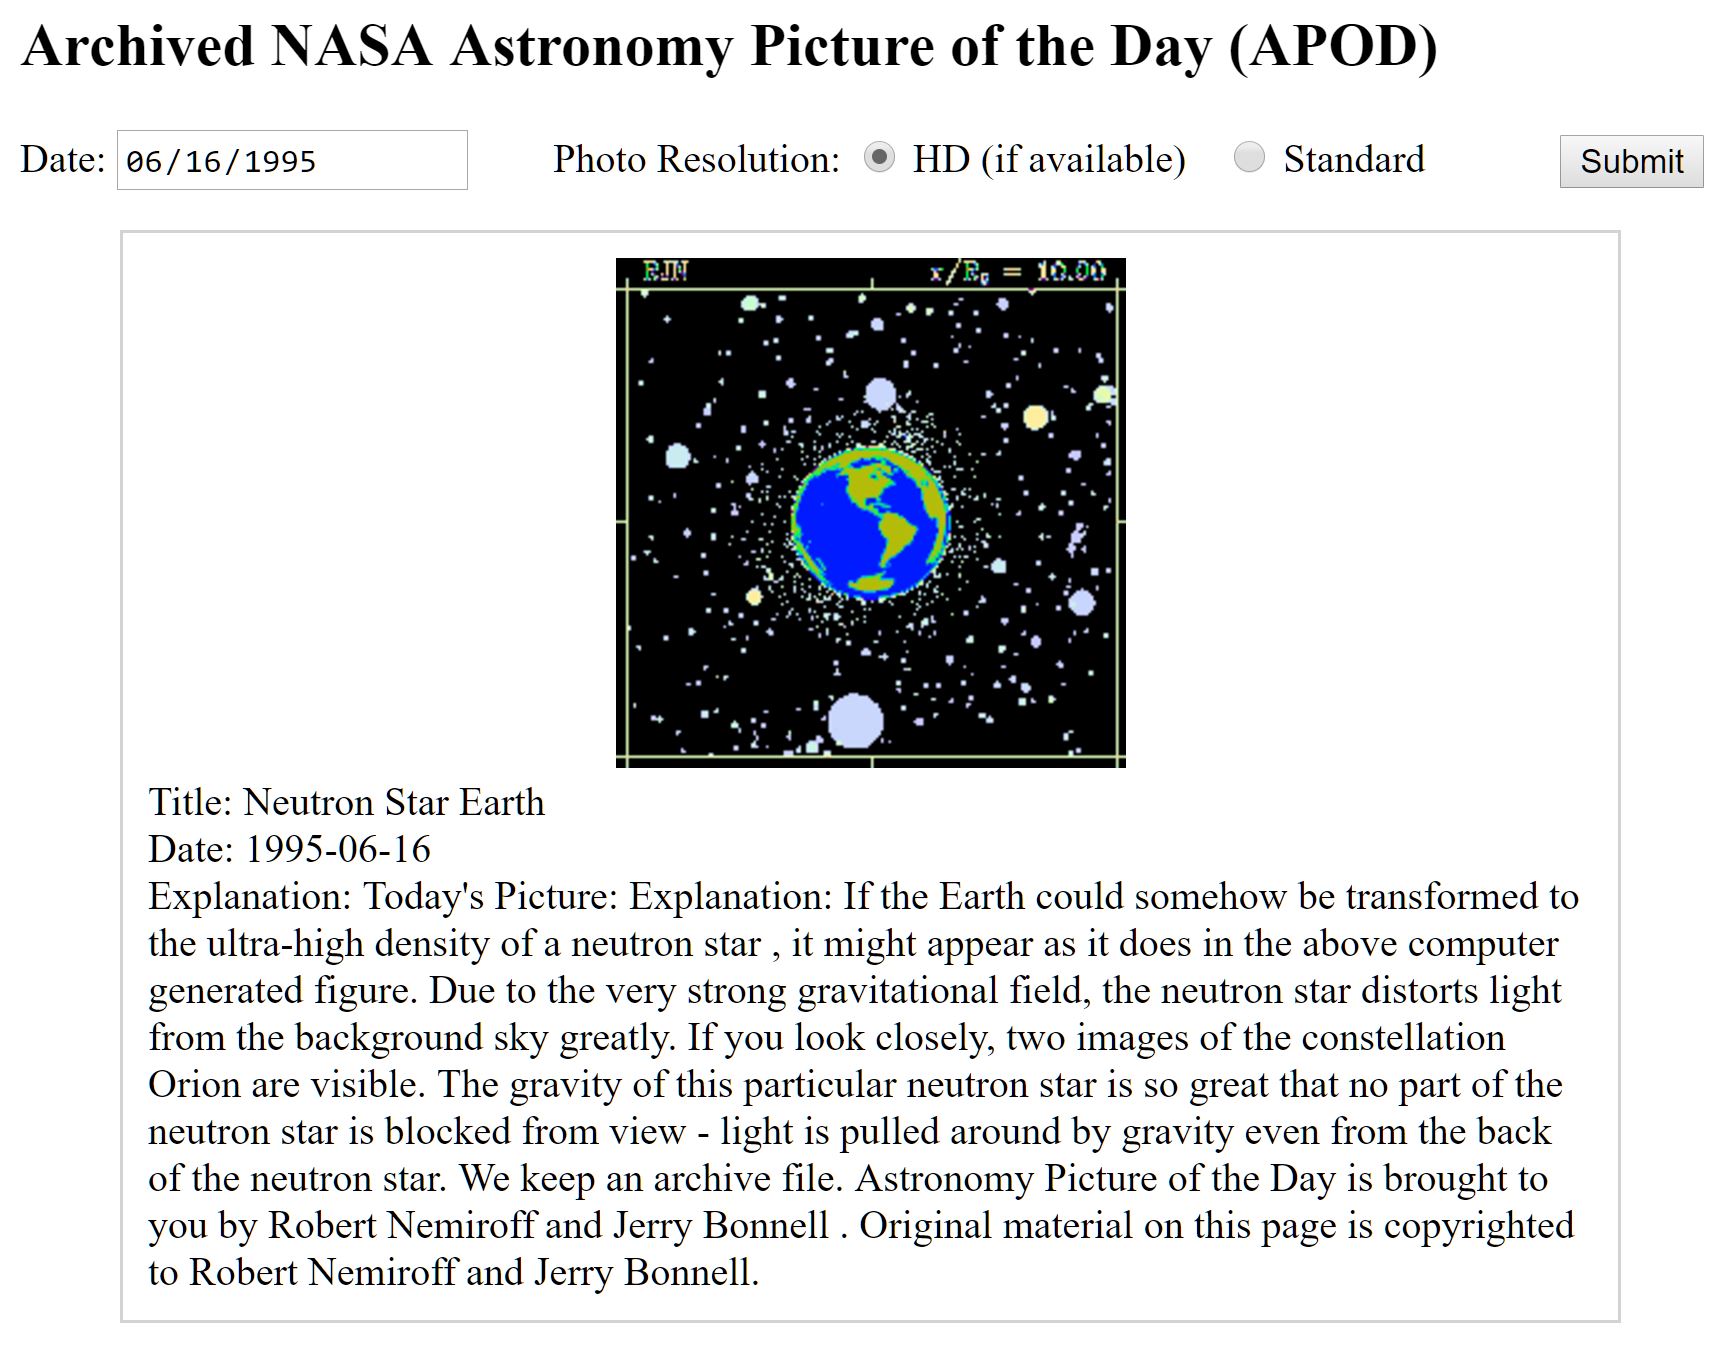
Now with all this put together, you'll get a page that nicely displays today's APOD media, whether it's an image or video, and any available captions to go along with it. Below is a screenshot of the resulting page at the time of writing this guide.